
|
|
#1
 05-12-2013, 12:01 PM
|
||||
|
||||
|
Years ago, I picked up one of those funny Venus Probes from Estes. I don't know why, I just thought it was interesting enough to try. I worked on it for a while, then when things got tough, I put it aside. After rediscovering it in the attic, I've been tinkering with it. I sanded down the body of the capsule, and finally settled on giving some life to the pilot, Zane (full name: Zane E. Gray), by painting ?him? (automotive primer gray).
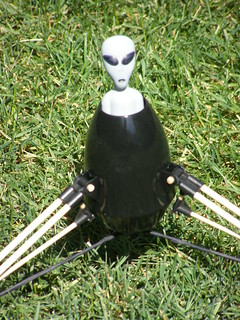 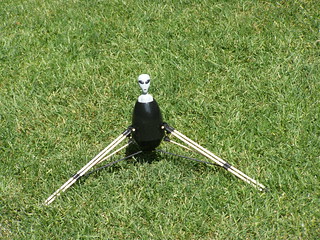 (I mean, really... Little Green 'Men' are so cliche) As I was poking around for some videos and other images, I learned how underpowered the VP was. This took me some time to mull over, but I finally figured out how to make the rocket "D" powered. Last night I tore off the old fin can (fins hadn't been built yet... I didn't like them, nor the self adhesive decals, probably one of the reasons it got put aside), then got modding.  I cut away the engine mount from the engine hook back, then used a spare centering ring (BT-20 to BT-50), and a second one that was a salvaged from a removed baffle, to center the new BT-50 engine mount (a spare 4" length of BT-50 engine tube I had from my CC Express (modded to become my Cherokee D clone)). Some of the Express' centering rings found their way into the new engine mount on the Venus Probe (to center the BT-50 inside the BT-55) The rocket could have been made for "E" power, but I didn't have enough BT-55 to make a fin can that large, and I already had a length of BT-55 scrap ready to go. As it stands now, the engine mount protrudes behind the fin can by about 3/16". I should mention that all the body tubes involved are thick walled construction, and I used a tube coupler from Semroc as a thrust ring (cut down some) to increase resistance to burn-through) I should have marked the BT-55 for the fin alignment before gluing everything in place, but I didn't. So, I had to improvise a solution by marking a BT-55 scrap, a couple of centering rings, and a spare D engine mount tube to mark the body tube. It turned out well, and I was able to slot the engine pod for fins. 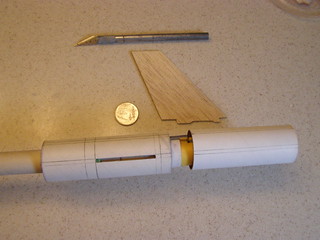 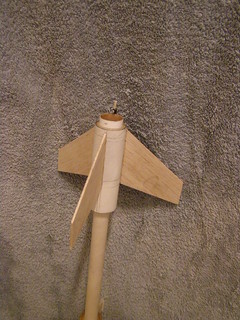 One of the things I didn't like about the original design was how it had three legs for the probe, but four fins. So, I modified the design in openrocket to see if it was stable with three fins (it is at zero wind which is how this rocket should fly anyways (I hear it's prone to weathercocking)). Then I used three of the larger fins (inverted) from the CC Express to create the new fins (after notching them for through-the-wall construction) for my build. 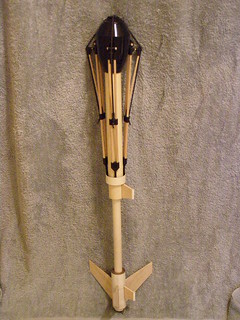 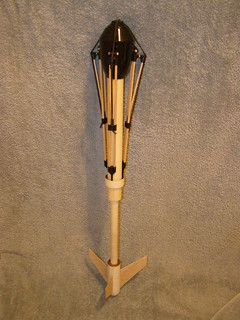 Estes Venus Probe Build The major problem (now): The original fins sheets have been lost to time, and I don't have a printer (at home) to print out the pattern for new ones just so I can measure the standoffs. Does anybody know how tall the launch lug standoff's are? <EDIT> Someone on TRF measured the standoff's to be 15/16(ish) inch, then I figured out that if I can place the engine and trailing edge of the main body tube on a stack of something of a known thickness, I could figure it out for myself (It turned out to be 16 US Quarter Dollars (or 1 1/16"(ish). I'm going to go with 1 1/16" stand offs to give myself a little margin of error.</EDIT> Thanks for looking... TBC Jim .
__________________
. . Dreaming of making the rockets I dreamed of as a kid (and then some). "The Guide says there is an art to flying", said Ford, "or rather a knack." "The knack lies in learning how to throw yourself at the ground and miss." Launching is Optional... Landing? That Depends on Trees. Last edited by K'Tesh : 05-14-2013 at 01:56 AM. 
|
|
#2
05-12-2013, 12:05 PM
|
||||
|
||||
|
I've built a few Venus Probes over the years. I've never been able to figure out WHY it's a skill level one. I'd call it a three. IMO
__________________
Never trust an atom. They make up everything. 4 out of 3 people struggle with math. Chemically, alcohol IS a solution. NAR# 94042 SAM# 0078
|
|
#3
05-12-2013, 04:53 PM
|
||||
|
||||
|
Couple of detail shots...
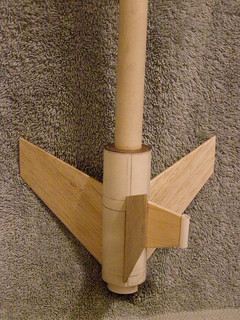  The standoff's for the launch lugs came out to be a smidge under 1 1/16" (not including the tabs), and they are 1/8" thick. Knowing how heavy this rocket is, I decided to use 3/16" lugs. If I had one to do over again... One change from all the rest that I've already done would be to drill a hole through the top of the nosecone 'cap' and tie the shock cord for the pod off there instead of solely trusting in the joint formed from the pilot to the pod. ?His? job's stressful enough without having to hold onto that parachute too. Oh, and a few details... I used a Sharpie pen to color the pod leg's elastic black instead of leaving them white, and used an extra fine Sharpie to give Zane his nostrils. I'm planning on keeping a traditional look (black/white/silver) for the paint job, but I've yet to figure out if/how I'll be changing it (one thing is certain though... you can forget about me using the "solar panel" decals) Thanks for looking! Jim .
__________________
. . Dreaming of making the rockets I dreamed of as a kid (and then some). "The Guide says there is an art to flying", said Ford, "or rather a knack." "The knack lies in learning how to throw yourself at the ground and miss." Launching is Optional... Landing? That Depends on Trees. Last edited by K'Tesh : 05-13-2013 at 02:08 PM.
|
|
#4
05-13-2013, 12:52 PM
|
||||
|
||||
|
http://ashasta-sadie.com/FArchive1.html
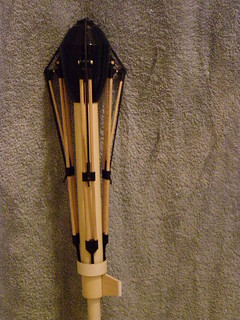
One of the things I don't like about the Venus Probe is the wooden parts for the legs. Mind you, I'm not against wood, but the dowels seem a little too rough for a nice finish. In step 2 of the leg assembly of the instructions (step "H") it says that "You may wish to paint the leg assembly dowels with silver bottle paint at this time and allow the legs to dry". I don't know about you folks, but I've never had much luck with my brush work. I prefer spray paint. I've attempted to paint the dowels with a silver Sharpie pen, but I'm not thrilled with the results so far. Part of the problem is the irregular surface. The best results might be had from using AeroGloss filler, sanding, and painting, but that's a lot of work, and I'm worried that it may cause further fit problems (I know, easy to solve, but I don't want them anyway). Now my lander's legs haven't been glued together yet (I was more worried about breakage over they years than loss, so I have yet to glue the legs together for the final assembly (I did however, use tape to thicken the ends of the legs to get them to hold tight (friction fit) for the time being). I've thought about adding aluminum tubing from the LHS to slide over the legs, but I'm reluctant to add that due to strength/weight/cost issues (that was before I upped it to a 24mm powered version). Now I have a new idea, one that might not suck... I'm looking for straws that are the right diameter to slide over the existing dowels. I could paint them silver, aluminum, or chrome (preferred), let them dry, then re-build the legs with the straws covering the wood. So far, I haven't found the right straws, but I'm keeping my eyes open. The smaller diameter dowels may need a 'stir' stick straw (so far my campus' Starbucks seems the best candidate). If I can find a straw that is just a smidge too large, perhaps I can use some tape to thicken it, if not, I may split the straw lengthwise and snap it over the dowel. I am a little worried about the paint not adhering well, so I'll keep you all posted. Who knows I may even just wrap them with paper, then paint. Now I just need to locate the best source of straws (McDonalds, and Subway are already out of contention). Thanks for looking... TBC Jim .
__________________
. . Dreaming of making the rockets I dreamed of as a kid (and then some). "The Guide says there is an art to flying", said Ford, "or rather a knack." "The knack lies in learning how to throw yourself at the ground and miss." Launching is Optional... Landing? That Depends on Trees.
|
|
#5
05-13-2013, 12:58 PM
|
|||
|
|||
|
__________________
John NAR #91135 L1 SAM #0037
|
|
#6
05-13-2013, 01:02 PM
|
||||
|
||||
|
Quote:
OH! Now that does look NICE!  The LHS has some of that too... hmmm... I was planning on heading over there later today or this week. The natural look of carbon fiber... Or silver... hmmm, both sound nice. Thanks for the suggestion! Jim .
__________________
. . Dreaming of making the rockets I dreamed of as a kid (and then some). "The Guide says there is an art to flying", said Ford, "or rather a knack." "The knack lies in learning how to throw yourself at the ground and miss." Launching is Optional... Landing? That Depends on Trees.
|
|
#7
05-13-2013, 01:59 PM
|
||||
|
||||
|
Always thought that rocket was a POWR-PRANG waiting to happen.
__________________
When in doubt, WHACK the GAS and DITCH the brake !!! Yes, there is such a thing as NORMAL, if you have to ask what is "NORMAL" , you probably aren't ! Failure may not be an OPTION, but it is ALWAYS a POSSIBILITY. ALL systems are GO for MAYHEM, CHAOS, TURMOIL, FIASCOS, and HAVOC !
|
|
#8
05-14-2013, 03:13 PM
|
||||
|
||||
|
Went online yesterday, and found that according to the instructions the dowels were 3/16" (.1875") and 1/8" (.125") thick (how accurate that is, I'm not certain)... I didn't think to check about the length of them. Headed off to the LBS, and picked up a .118" Carbon Fiber rod (they were out of .125") and a .196" tube (both the rod and tube were 48")
The rod was a little too loose for my tastes (glue could solve that, but I've got them to order more .125"). The tube fits fine, except... the legs need six 10" lengths... I've got 48". Well, at least I picked up the 3/32" thick balsa I forgot yesterday so I can start finning the Optima downscale. The problem that still remains... my 2nd Venus Probe (yes, I've got 2 (since yesterday morning)) I bought out all the .196" carbon fiber tube they had, and I still need another length (or at least 20"). Does anybody know how well carbon fiber takes paint? I was able to rub off all of the silver Sharpie I tried as an experiment, and the CF parts don't have that cool crosshatched look that I associate with CF components. Thanks! (TBC) Jim
__________________
. . Dreaming of making the rockets I dreamed of as a kid (and then some). "The Guide says there is an art to flying", said Ford, "or rather a knack." "The knack lies in learning how to throw yourself at the ground and miss." Launching is Optional... Landing? That Depends on Trees. Last edited by K'Tesh : 05-14-2013 at 04:33 PM.
|
|
#10
05-27-2013, 02:56 AM
|
||||
|
||||
|
Not that there was anything wrong with my first build, but I had a lot of fun building this, so I figured it was worth a 2nd round (this one has a Green: Name: Mr. Green Genes).
For my first modification, I changed how the lander is attached to the recovery system... Having the stress of deployment fully rely on the strength of the bond of the alien to the lander just didn't feel very reliable. 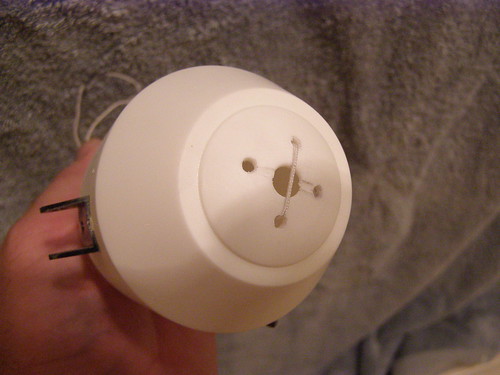 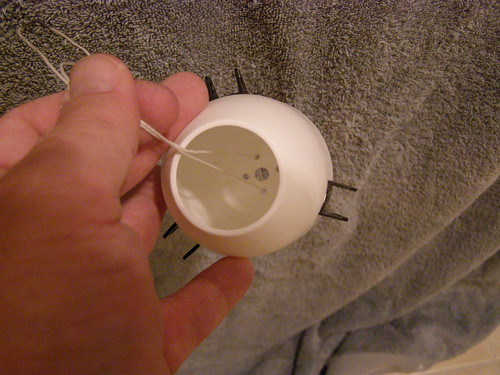 I first tried to use a piece of stiff wire to attach the cord to the bottom of the lander... FAIL! I notched the bottom of the lander to accommodate the wire... FAIL! I drilled a pair of holes to tie the cord to, but then decided that the notch may have weakened the plastic enough to possibly cause a failure. So, I drilled another pair of holes and used them to secure the cord. I'm happy with this. Next modification was to replace all the wooden parts with carbon fiber rods. Several of the included dowels were warped badly. 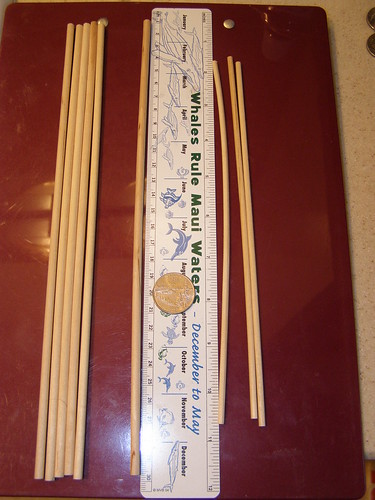 Warp is fine for Star Trek, but for a model rocket, not so good. The rods I used were slightly larger than the 1/8" and 3/16" that the kit uses, but they seem to fit better. I haven't glued them into place yet. I still have to experiment with the painting process before I do. An added benefit... The 3/4" long pins that hold the legs to the lander are now much more secure. The biggest modification to this kit was to increase the motor mount from a 18mm to a 24mm mount. 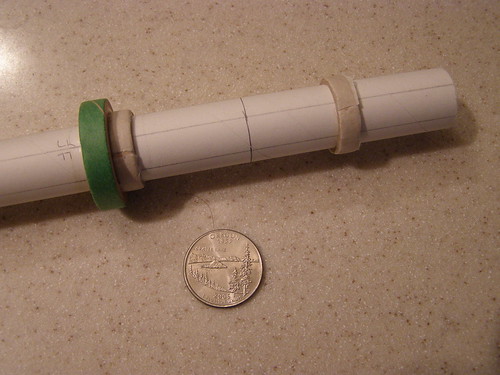  I built the most of the motor mount as the instructions, but removed the last 2 1/2" of the BT-20 tube used for the mount. I then used two (slightly thickened with masking tape) centering rings from Sunward to center 4" of BT-50 over the BT-20. This has the added benefit of creating a thrust ring that the kit lacked.   I then modified one of the stock centering rings (used to hold the BT-20 inside the BT-55 used for the fin can), and a spare BT-50 to BT-55 centering ring I had to hold the BT-50 section in place. One was centered over the thrust ring, the other was notched to allow for the engine clip. The notched ring was glued inside the back end of the BT-55, then after drying, I applied glue to the BT-50 where the fin can would end up being and inside the BT-55 where the 'thrust ring ' would come into contact with it. I then slid the fin can almost into place. and added glue to the inside of the top end of the fin can. I finally slid the fin can into place, and allowed it to dry. (Note: This time I marked the fin can with LL and fin lines before gluing into place)  I've also used a Sharpie pen to color the elastic for the legs black, and I've cut fins to match the CC Express fins used on the first Venus probe build. However, I haven't had the time or energy to notch them or cut slots into the fin can. That's enough for now... More Later Jim .
__________________
. . Dreaming of making the rockets I dreamed of as a kid (and then some). "The Guide says there is an art to flying", said Ford, "or rather a knack." "The knack lies in learning how to throw yourself at the ground and miss." Launching is Optional... Landing? That Depends on Trees. Last edited by K'Tesh : 05-27-2013 at 08:54 AM.
|
 |
| Thread Tools | Search this Thread |
| Display Modes | |
|
|


 Linear Mode

